
You bought a standing desk to stop sitting all day. Good call. But here is the part nobody tells you: a standing desk set up wrong can give you neck pain, shoulder fatigue, and wrist strain that is just as bad as what you were trying to escape. The setup matters as much as the purchase.
I have spent a lot of time figuring out the difference between a standing desk that collects dust and one that actually changes how your workday feels. The short answer is ergonomics, a decent anti-fatigue mat, and a real routine. The long answer is what follows. The desk I recommend for most home offices is the ErGear 48-inch electric standing desk, which I walk through in detail in my full ErGear long-term review. This guide focuses on getting it set up correctly from the minute you pull it out of the box.
Still sitting all day? This is the desk that makes standing actually stick.
The ErGear 48-inch electric standing desk is quiet, stable under a full monitor setup, and has four memory presets so switching from sit to stand takes one button press. Rated 4.5 stars across more than 11,000 reviews.
Amazon Check Today's Price on Amazon →Step 1: Assemble on a Hard, Level Surface
Before you attach a single cable or set a single preset, make sure you are assembling the desk on the floor where it will live, not in a hallway and not on carpet. Standing desks with electric motors need a level surface to calibrate correctly. If you assemble on uneven flooring and then move the desk, you may need to re-run the calibration reset.
For the ErGear specifically: attach both leg frames to the crossbar first, snug but not fully torqued. Lay the desktop face-down on a clean towel or moving blanket, then lower the frame onto it and align the pre-drilled holes. Use the included screws and hand-tighten before going back with the Allen wrench. Over-tightening strips the particle board inserts, so firm is good enough. Flip the assembled desk upright, plug in the motor cable, and run the factory reset: hold the DOWN button until the desk descends to its lowest point and you hear a click. That click tells you the motor has found its reference point.
Time budget: about 45 minutes if you lay everything out before you start. Read the instructions once fully before picking up a tool. The one step most people skip is the calibration reset, and it is the most important one. An un-calibrated ErGear will sometimes refuse to raise past a certain height, which most owners chalk up to a defective unit. It is not defective. It just needs the reset.

Step 2: Find Your Correct Standing Height
This is the step that makes or breaks the whole setup. Wrong height means wrong posture. Wrong posture means you will stop standing within a week because it hurts.
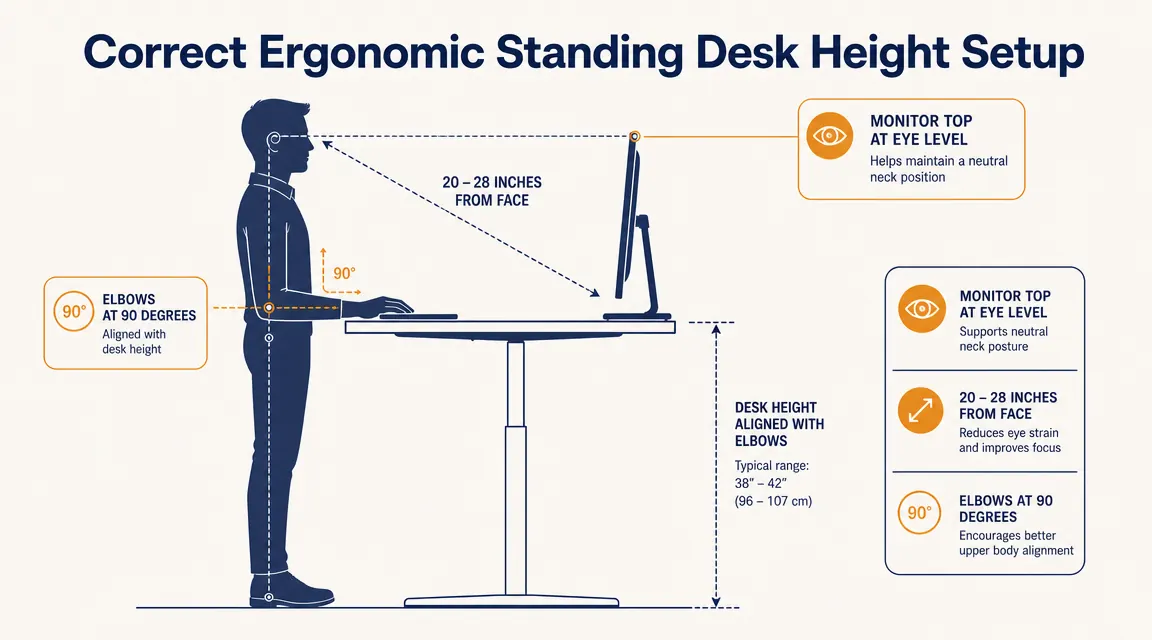
The rule is simple: stand up straight with your arms at your sides. Bend your elbows to 90 degrees, as if you were about to type. The height of your forearms is your desk height. For most adults this lands somewhere between 38 and 44 inches. If you are 5 feet 6 inches tall, you are probably in the 38 to 40 inch range. If you are 6 feet 2 inches, you are looking at 43 to 45 inches. Do not guess. Measure with a tape measure from the floor to the bottom of your forearm with elbows bent. Write that number down and program it as Preset 1 on the ErGear control panel.
Program your sitting height as Preset 2. That is typically 28 to 30 inches for most desk chairs, but measure it the same way: sit down, rest your arms on the desk surface at elbow height, confirm you are not shrugging or reaching down. If your chair has adjustable height, set the chair first, then measure. The goal is the same whether sitting or standing: forearms roughly parallel to the floor, shoulders relaxed, no shrugging. Program both heights before you do anything else, because having that one-button switch ready is what keeps people using the desk three months later instead of parking a lamp on it.
Step 3: Position Your Monitor Correctly
The most common mistake I see in home office photos is a monitor that is too low. When you are standing, your eyes should meet the top third of the screen, not the middle. If you are looking down at your screen, your neck is bent forward and your upper back will complain about it by mid-afternoon.
The target: top of the monitor at or just below eye level when you are standing tall. Distance: 20 to 28 inches from your face, roughly arm's length. If you use a 27-inch monitor, you will want the farther end of that range. For a standard desk with no riser, most monitors on their factory stands are too low for standing height. You have two options: use a monitor arm (recommended, keeps the desk surface clear) or add a solid riser block. A monitor arm also lets you tilt and swivel without moving the whole setup, which matters when you are switching between sitting and standing positions multiple times a day.
One thing people do not think about until it is too late: when you switch from sitting to standing, the monitor needs to travel with the desk. If your monitor is on a stack of books or a static riser bolted to the desk, that works fine because it moves with the desktop. If your monitor is on a separate shelf or attached to the wall, you will end up with it at the wrong height for one of your two positions. A desk-mounted monitor arm solves this cleanly, adjusts in seconds, and keeps the desk surface clear for actual work.
Your eyes should meet the top third of the screen. If you are looking down, your neck is already working harder than it should be.

Step 4: Route Your Cables Before You Set Anything Else Down
Do this before you plug in your monitor, before you set up your keyboard, before you put anything on the desk surface. Cable management is infinitely easier on an empty desk, and once you have done it right, you will never have to think about it again.
The ErGear does not come with a cable management tray but the mounting holes are pre-drilled for one. Pick up a basic under-desk cable tray (they run about ten dollars on Amazon) and attach it to the underside of the desktop before you flip the desk upright. Run your power strip into the tray, then route monitor power, laptop charger, and USB hub cables through the tray and up the inside of one leg column using adhesive cable clips. Leave a loop of slack at the top of each leg, about six inches, so cables do not pull tight when the desk raises. Without the slack loop, raising the desk all the way up will tug at your cables and eventually damage the connectors.
For a laptop-centered setup, a USB-C docking station changes this game entirely. One cable from the dock to your laptop means you can grab the laptop and walk away without touching anything else. The cables stay behind. I cover that workflow separately, but the cable routing principles in this step apply regardless of how many peripherals you are running.

Step 5: Add an Anti-Fatigue Mat Before Your First Standing Session
This is not optional if you plan to stand for more than 30 minutes at a stretch. Standing on a hard floor, even hardwood or tile, creates pressure points in your feet and ankles that build up over a few hours. Most people who try standing desks and quit do so within the first two weeks, and aching feet are the reason.
A 3/4-inch thick anti-fatigue mat gives your feet a surface that absorbs compression and encourages small, unconscious weight shifts that keep your legs from locking up. The ComfiLife anti-fatigue mat is the one I recommend for this setup. I tested it for a full year of daily use and cover the details in my ComfiLife anti-fatigue mat review. It is 3/4 inch thick, has a non-slip base that actually holds on hardwood, and does not have the aggressive rocker terrain some mats use, which takes getting used to and some people never like. Place it centered in front of your standing height position, not pushed against the desk frame. You want your toes about two to three inches from the desk base when you step onto the mat. That slight gap prevents toe stubbing when the desk is in its lowest position and keeps the mat from sliding under the leg columns over time.
What Else Helps
Once the desk is set up correctly, the thing that determines whether you actually stand is habit design. Set a timer or use a rule: stand for the first 30 minutes of every hour and sit for the second 30. That alternating rhythm is more sustainable than trying to stand for two-hour stretches. Most people find that standing for 3 to 4 hours of an 8-hour workday is plenty and produces real energy and focus benefits without fatigue. If you are brand new to standing desks, start with 20-minute standing intervals and add five minutes per week. Jumping straight to 90-minute standing sessions on day one is how people end up with sore calves and a desk they stop using.
A few other things that make a real difference: good footwear even in a home office (standing barefoot cancels out half the benefit of the mat), keeping a water bottle on the desk (hydration helps more than most people expect with afternoon energy), and placing your phone out of arm's reach when standing so you are not tempted to look down at it, which defeats the posture benefit of standing in the first place. Keeping your keyboard and mouse at the correct height is also worth revisiting after you set your standing preset. Some people adjust the desk height and forget that their keyboard tray or keyboard riser needs to match.
Quick ergonomics checklist before your first full day: desk height matches elbow height when standing, monitor top is at or just below eye level, screen is 20 to 28 inches away, mat is centered in front of the desk, cables have slack loops at each leg, both height presets are programmed. That is everything. If all six are true, you have a better standing desk setup than most people who have owned theirs for a year.
If you are still comparing desk options before committing, the ErGear vs FlexiSpot comparison breaks down where each desk wins on stability, motor noise, and price so you can decide with real information rather than spec sheet guessing.
On the mat side, if you have been standing on a hard floor and your feet are already complaining, the story behind why I finally bought an anti-fatigue mat is worth reading before you try to tough it out another week.
The single biggest predictor of whether you actually use a standing desk is whether it takes one button press to switch. Program your presets on day one.
Set it up once, use it every day. The ErGear makes switching effortless.
Four programmable height presets, a quiet dual-motor lift rated to 265 lbs, and a 48 by 24 inch surface that fits a monitor, laptop, and keyboard without crowding. It is the desk I recommend to anyone setting up a home office from scratch.
Amazon Check Today's Price on Amazon →